The car was vibrating, I was doing 40mph on an A road and there was this cake slash frosting tower sitting (rather unhygienically) on my passenger seat floor. I don’t think cars are supposed to shake at 40, but I’ll let mine off on the grounds of my horrific driving which has likely caused the thing a number of car-health related issues. Hannah from The Littlest Bakehouse and I are driving to Manchester from London in August for the Cake Hunter’s wedding (!!!), so this is my pre-warning to you both that we MAY not make it alive.
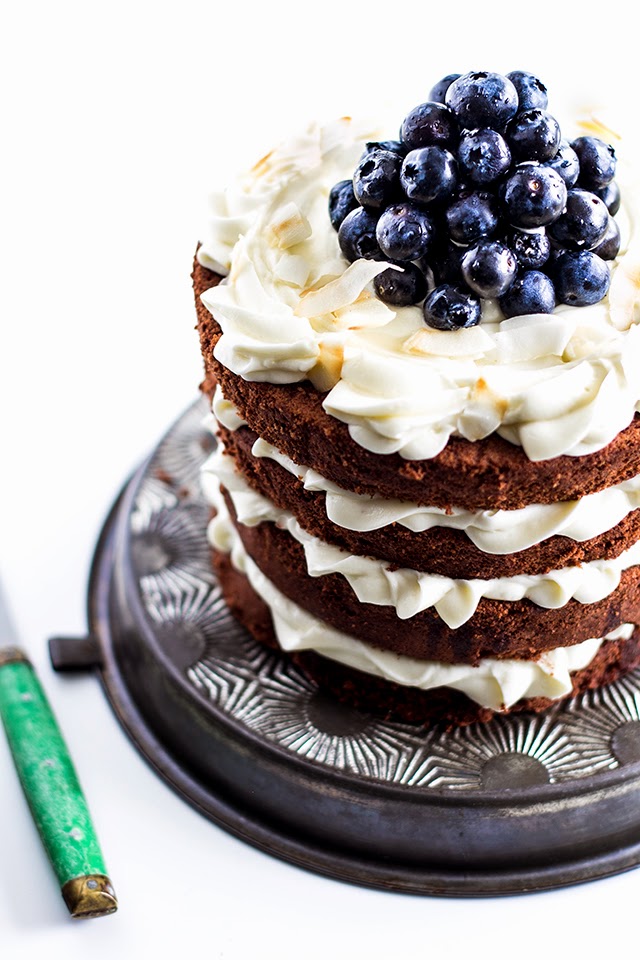
Just a few fruit fell from the frankly pointless blueberry volcano I decided to fancifully pile the cake with. When I parked up, I quickly glued the bluebs back into place with icing, before the boyf jumped in and we made our way to Street Feast in Lewisham to celebrate his 24th day of birth. Suffice to say, he shortly followed with “Did you glue the blueberries on with icing by any chance?” (Face-palm).
I never got to properly eat a slice of the cake, but he said it tasted pretty darn good, and we’ve been together since the exact birth of this blog - cue explanation as to why that is relevant…. Also I dipped syrupy offcuts into leftover icing ;)
We are that cringy ‘red velvet cake on Valentines’ couple. But last year, the Malteser chocolate malt cake I made on his birthday leaned to the left like a condensed leaning tower of Pisa performing a drag act. So I went with our valentine’s tradition but I cut out the food colouring, because the entire bottle, which is needed for a “proper” red velv, gives the cake a really noticeable sour tang. And regardless of the childish excitement a brilliant red cake instils in me to this day, I can no longer handle that tang.
In with the tealeaves! The tea flavour is faint in this ‘tea velvet’, perhaps slightly masked by the cocoa powder, but we much prefer it to food colouring flavour.
Inspired by the Pastry Affair's Black Tea Cake with Honey Buttercream
180g unsalted butter
420g caster sugar
3 eggs, large
485g plain flour
45g cocoa powder
250ml milk
150g high-grade tealeaves (or 10 tea bags with the bags removed)
1 tbsp lemon juice/white wine vinegar
1 ½ tsp baking soda
1 ½ tsp white wine vinegar
100g sugar
150ml water
Handful of high-grade tealeaves
100g unsalted butter, room temp
600g icing sugar
250g full fat cream cheese
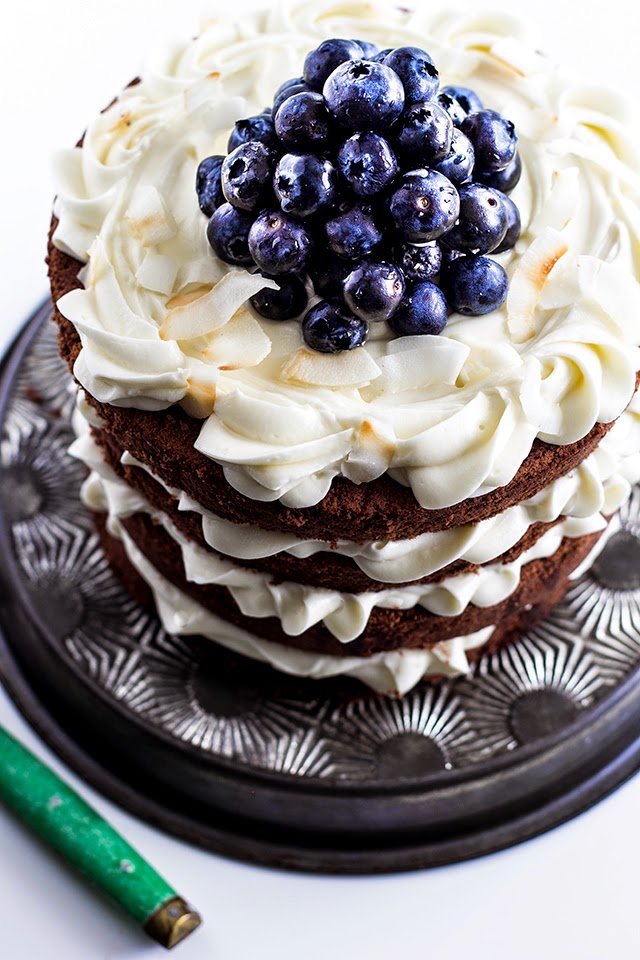
Handful of blueberries, toasted coconut shavings to decorate - optional
Notes: There are a few lengthy steps in this recipe, like steeping milk and letting the cakes rest in the fridge before slicing. Set aside a couple of days to make this cake.
Notes II: I know you’re looking at that icing recipe and wondering whether it causes diabetes. The sad fact is that frostings with cream cheese aren’t sturdy enough to ice the walls of cakes/create rosettes without that much icing sugar - which is a shame because it’s heaps more palatable than traditional frosting.
Method
Place milk in heavy bottomed saucepan with tea leaves, let simmer on a low heat for five minutes. Remove from heat and leave to cool. Cover and refrigerate overnight to further steep the milk.
Line two 6 inch cake tins with parchment paper and preheat the oven to 180 degrees C. Add lemon juice to tea milk and stir, set aside to do its thang.
Using either a freestanding mixer or electric whisk, on high speed, cream the butter and sugar together until light and fluffy, around 4 minutes. Continue mixing butter on medium, adding the eggs one by one.
In a bowl, sieve together cocoa and flour. On medium speed, add a third of the flour, then a third of the curdled tea milk, alternating between both until everything is smoothly incorporated.
In a small bowl, add the baking soda, then the white wine vinegar. It will immediately froth up, add it straight into the cake batter and gently fold in using a spatula. Divide among pans and bake for 35 minutes, or until a skewer comes out clean and the cake is coming away from the sides of the pan.
Let the cakes cool to room temp, cover in cling film and refrigerate for a few hours/overnight. Slice both cakes horizontally with a serrated knife so that you have four equal layers.
Meanwhile, make the syrup. Add all of the ingredients into a saucepan and let simmer on medium heat for 15 minutes. Take off the heat, pour into a jug and set aside. Poke several holes into the cakes and gently pour the slightly cooled syrup into the cakes - be scant with the syrup - over soaking will cause the cakes to tear.
Beat the icing sugar, butter and just a tablespoon of the cream cheese together on high speed until light, fluffy and pale - around 2/3 minutes. Add the rest of the cream cheese and beat on medium speed, immediately stop mixing once fully incorporated.
Fill a piping bag fitted with a closed star tip with the icing and build the cake layers by piping rosettes around the edge of each layer. Squeeze a dollop of icing in the middle of each layer and smooth off with a spatula before adding the next layer. Finish the top layer with the same effect and sprinkle with coconut/blueberries/sprinkles/bananas/beef sirloin.
Cake will keep for three days if covered and refrigerated.
Love Em xx
What a beauty, I am so with you on ditching the red food colouring. Especially as the only ones which don't end up brown are the ones with ground up bugs in, blurgh! Eeek hope your car is okay xx
ReplyDeleteGround up bugs? Really?! Oh my, thats the first I've heard of this! Tell me more tell me more!
DeleteAnd thanks for the motor-concern, it had a little fix up shortly after this post :) x
Your cake looks just irresistible! I would love to try it!
ReplyDeleteThanks Medeja, you so should!
DeleteWhat a stunner of a cake!
ReplyDeleteThis looks amazing! I love that mini pile of blueberries on top. So cute!
ReplyDeleteIs that malt cake from the Hummingbird Bakery cookbook? I made a Malt Cake last year for a friend and it completely collapsed under its own weight! Seemed like too much of a coincidence !!
ReplyDeleteThe cake looks beautiful . Your decorating and your photography skills really is something I admire! L x
Thanks Lynsey, thats so kind of you!
DeleteYes, its from their latest book 'Cake Days'! Aaah, I cant believe someone else has had a disaster with the same cake - I dont get why they would publish an extremely tall cake with an extremely runny icing?! Also, my cake never rose quite as much as theirs!
Oh my goodness! I can't believe it actually is the same cake :P It was for a friends birthday as well so having to transport a broken collapsed cake was not an easy task!!! It tasted good just didn't look its best.
DeleteI have also had a bit of a disaster with the red velvet roulade thats in Cake Days too so a word of warning to avoid that too ;) L x
This cake is so simply beautiful. I've always been afraid of red velvet cakes as all the colouring freaks me out.
ReplyDeleteThanks Rochelle - you dont need to be afraif of this one! Give it a go :)
DeleteIncredible looking layer cake - wow! So impressed!
ReplyDeleteThat. Is. Stunning! I know how you feel about travelling with cake - if I ever watch those cake programmes on the food channel they have someone in the back holding the thing!
ReplyDeleteThank you! I hate it when they put the cake in the back of the van all on its own with noone in there, and then panic for the cameras - why didnt someone supervise the damn thing?!
DeleteThose photos. Oh my.
ReplyDeleteThat is all.
Looks gorgeous! And I agree about the red food colouring, you always need to use so much of it! Great idea to use the tea as a natural colorant.
ReplyDeleteThanks Kat! Natural colourant and beautiful taste :)
DeleteTea seems a far better idea for colouring! I've only made red velvet once and was quite shocked how much dye was needed!!
ReplyDeleteSometimes a bottle and a half Anne! Tea + chocolate :)
DeleteSuch a beautiful cake and such an amazing blog! Thanks for sharing.
ReplyDelete