Monday, 22 July 2013

Messy Salted Banoffee Pie And A Giveaway!


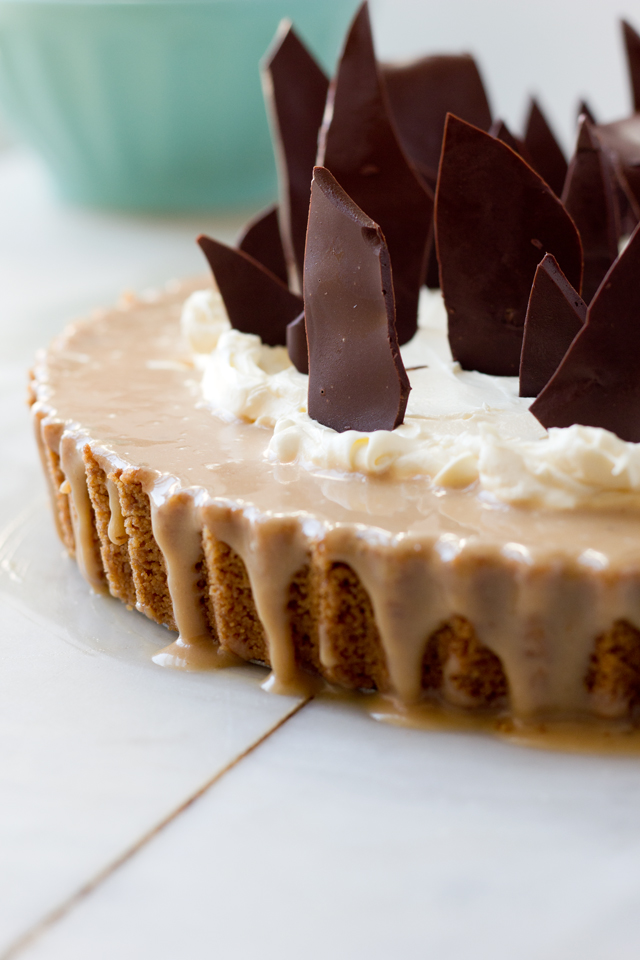
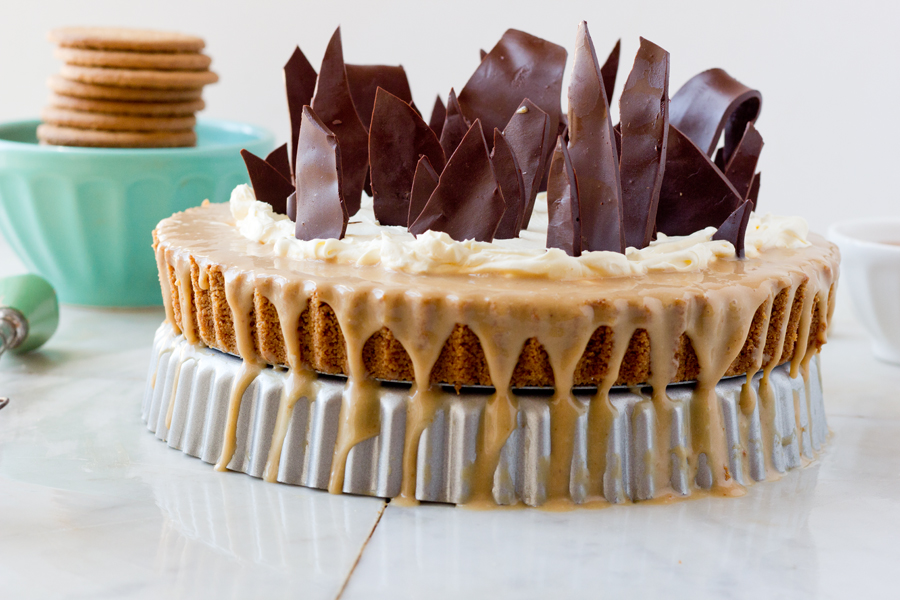
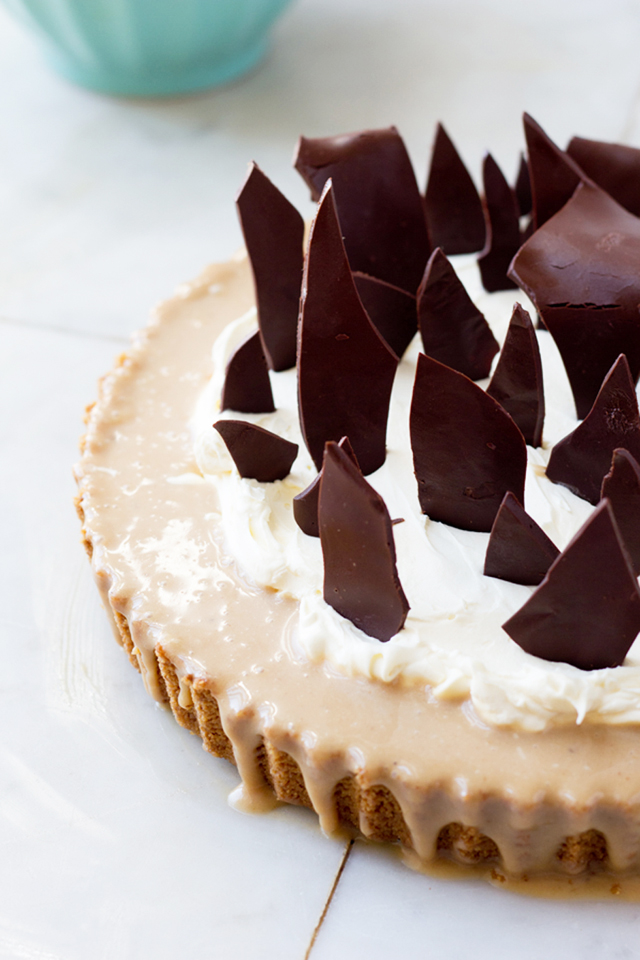
Never attempt homemade chocolate curls in 30 degree heat. Please.

Never expect a banoffee pie filling to firm up in 30 degree heat. Pretty please. Even in the freezer. 


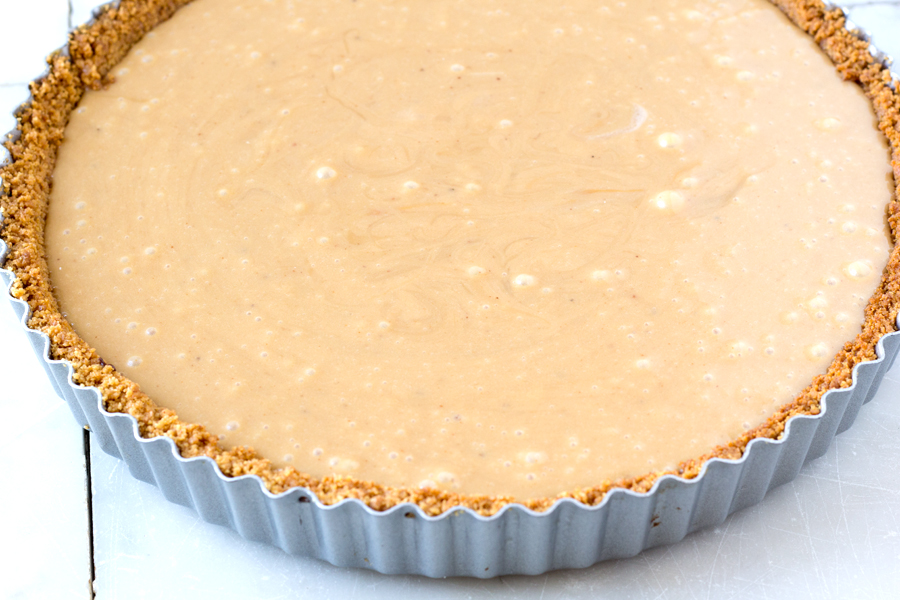
Never EVER add an extra half tin of dulce de lech to a pie, its not clever, don’t do it, I beg you!

If you should follow any advice from this pathetic, egocentric, conceited baker let it be this: always stick to the recipe, especially if it gave birth in Leith’s kitchen.

Of course, there has to be some leeway. After all, that chocolate was never gonna set whilst the walls were sweating. In this case: make super simple chocolate shards, all it takes is some hand action to create sharp spikes of chocolatey goodness.


Something else I learned: don’t even bother photographing this conjealed bananery mess, you’ll end up with filling on the floor (if you over filled the pie that is) and limp chocolate shards in half an hour.

It was in my favour that this pie was gobbled up by my aunts, uncles and cousins after a mouthwatering Mediterranean inspired barbeque, in the garden, at 11pm, in complete darkness.


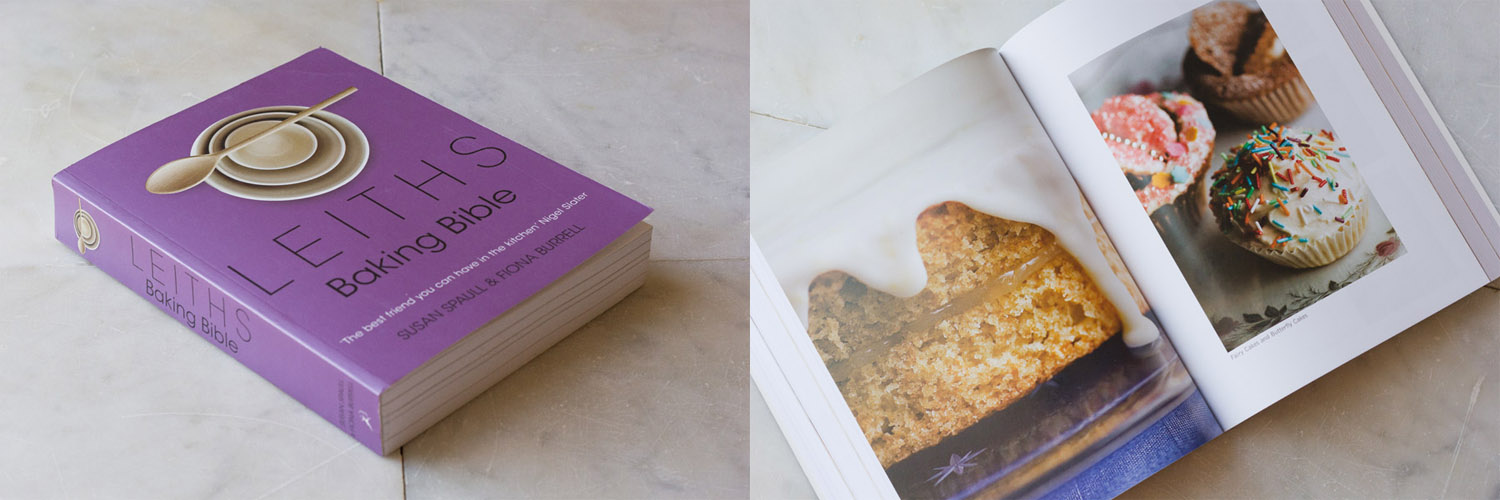
Lets skip to the fun part. Leiths School of Food and Wine was kind enough to send me over 2 copies of their esteemed Baking Bible, one for me and one for you!  

Seriously guys, its not called a bible for nothin’. 

This thing covers every angle within the broad spectrum of baking, it’s thick and full of knowledge, tarts, breads, Pecan Tassies, Raspberry Rugelach, chocolate almond squares (yum!) and a digestive encrusted banoffee pie…

That’s just a tiny taster of what entails within the bible of all bibles.  Obviously, the recipes are no fail, you only have to take one look at my overflowing pie to know that I got greedy and had a tin of dulce lying around.

As a way of saying THANK YOUUUUU to my readers, for every comment written, every recipe made, I am giving away one copy of Leiths Baking Bible. The giveaway ends on 5 August, you can enter as many times as you like & the winner will be selected randomly via Rafflecopter and then contacted by email as soon as you can say 'pie'.


The giveaway is open to UK residents only (sorry!), if you wana get your hands on ‘The best friend you can have in the kitchen’ according to ol’ Nigel Slater, enter below!

a Rafflecopter giveaway
The Recipe: Banoffee Pie by Leiths Baking Bible (with my alterations in red)


For the crust:

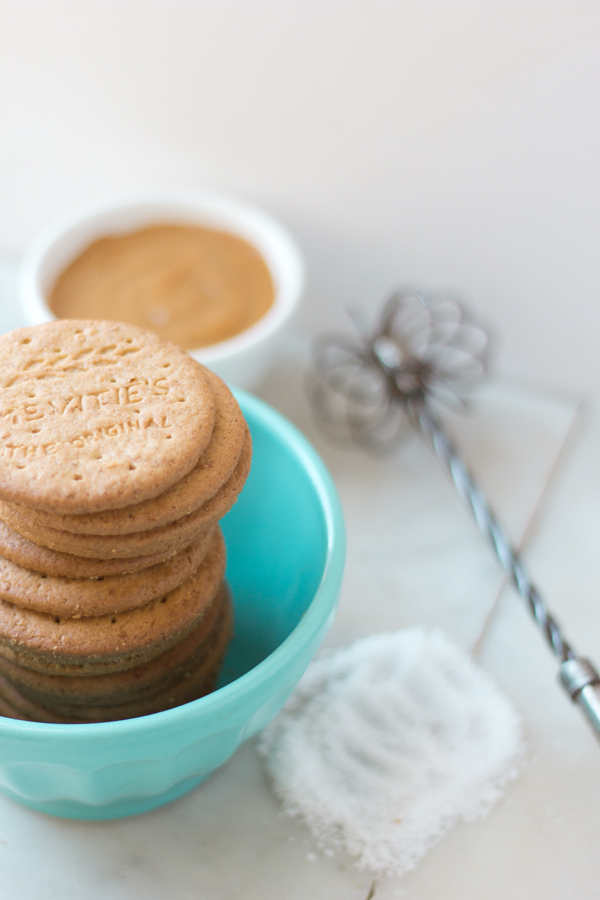
170g digestive biscuits (185g)
85, unsalted butter, melted
1 tbsp caster sugar
For the filling:
115g butter
115g light muscovado sugar
400g tin sweetened condensed milk (+ half a tin of Dulce De Lech - although I strongly advice against this moronic decision for obvious reasons!)
1 tsp sea salt
1 large banana, sliced (pulverised in a hand blender) 
1 tsp lemon juice
For the topping:
200g dark chocolate
150ml double cream (300ml)
1 tbsp icing sugar (omitted)
Half tsp vanilla essence (omitted)

Note: Blend the banana if you're not too keen on large chunks of bananas in the pie. Blending will add subtle notes of banana flavour evenly throughout the filling instead of big hits of banana every now and again. 

The Method:

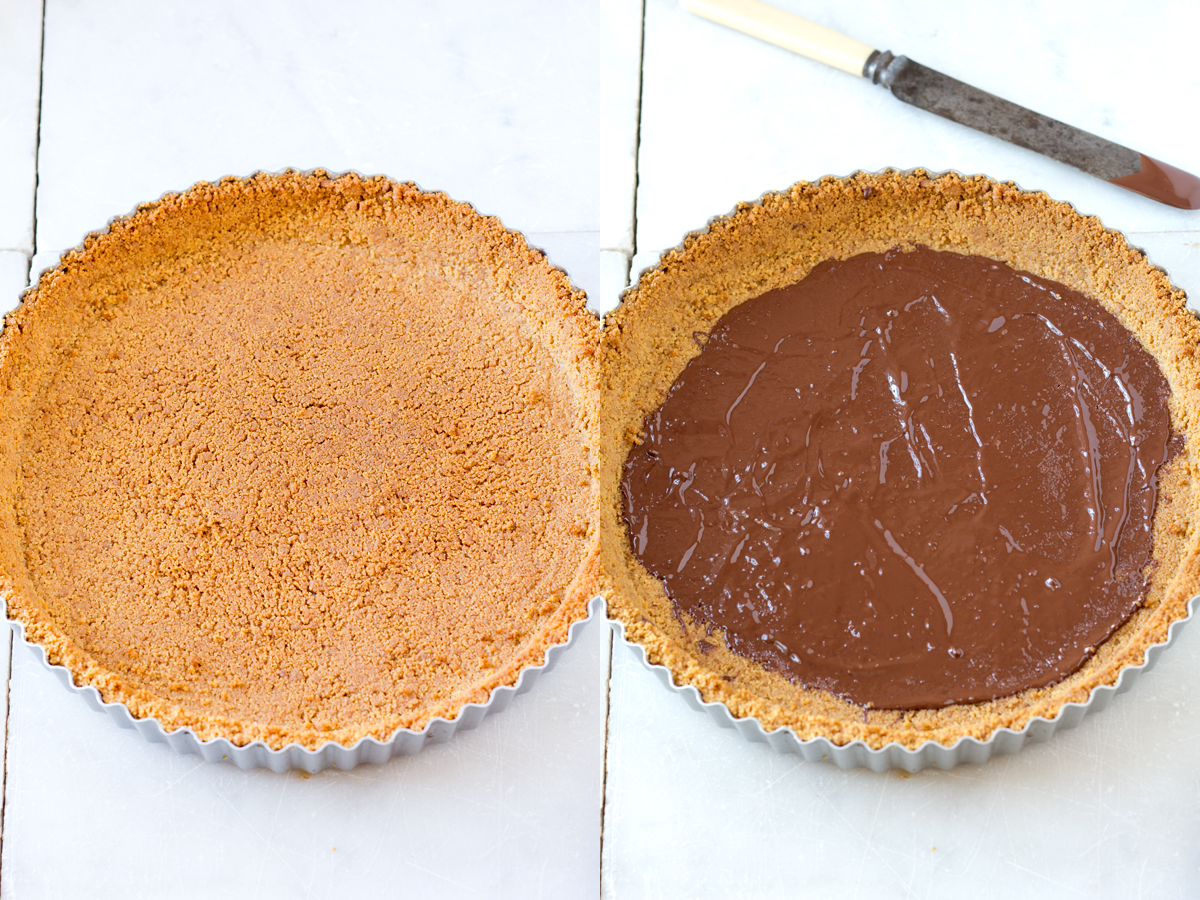
For the crust, place the digestive biscuits in a food processor and blitz to make fine crumbs. Gently pour in the melted butter and sugar whilst still blitzing. Press into a 23cm | 9 inch pastry case. Chill for 10 minutes. 

Heat the oven to 200 degree C | 400 F. 

Bake the crumb crust for 10 minutes or until browned. 

For the filling, place the butter, sugar and condensed milk into a saucepan over a low heat and warm until the butter melts and the sugar dissolves. 

Turn the heat up to boil the mixture, stirring until it becomes a golden caramel. Dip the base of the pan into a sink of cold water to stop the cooking. Remove from the water and leave to cool. Stir in the sea salt. 

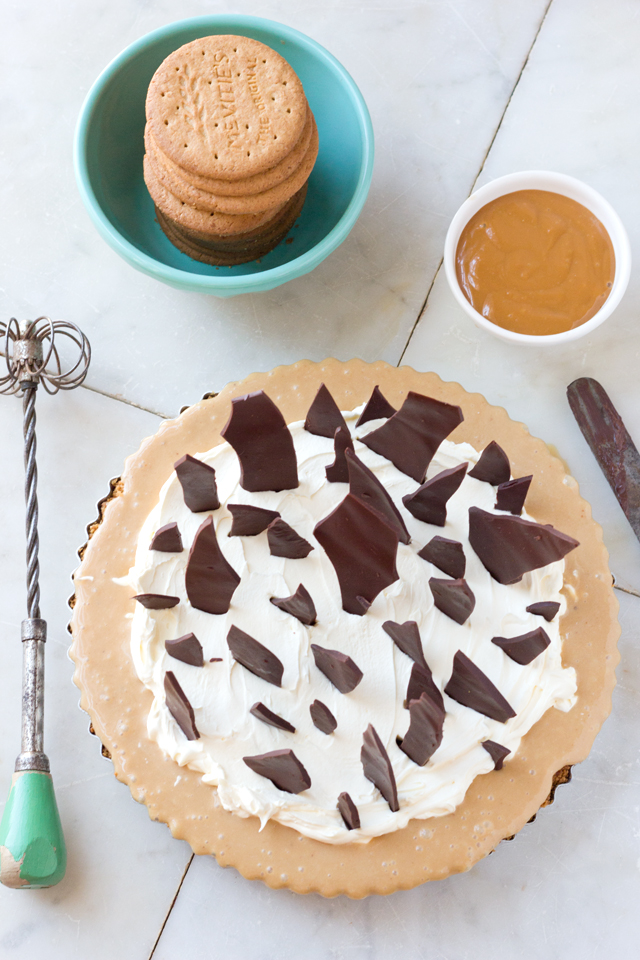
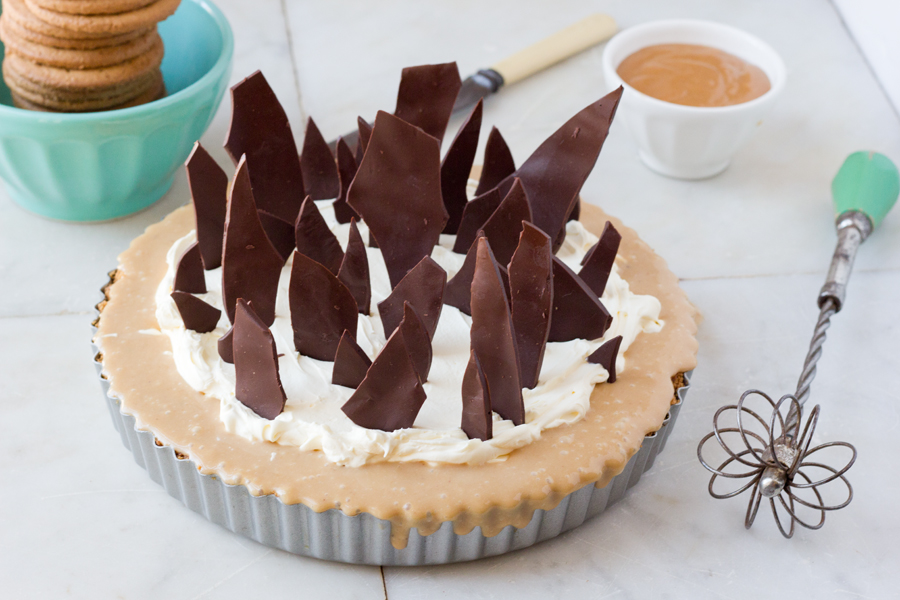
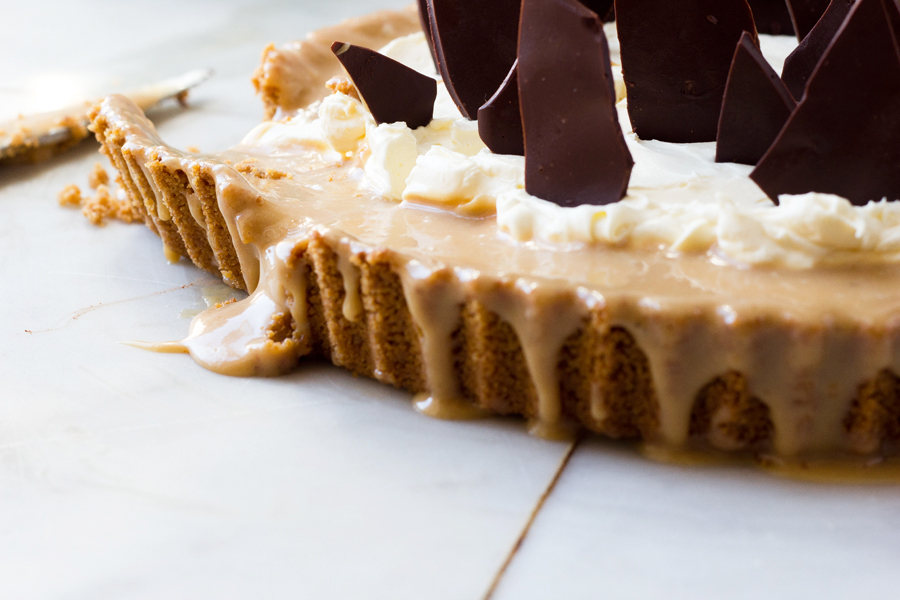
Melt the chocolate in a banmarie. Spread 2 tbsp of chocolate over the pastry base then leave the remaining chocolate to cool until it slightly thickens. Spread into a thin-ish layer over parchment paper. For chocolate curls, let it stand until nearly set, then scrape a thin sharp knife through the chocolate at a 45 degree angle to produce long curls. For chocolate shards, place the chocolate in the freezer for 20 minutes. Using your hands, crack the chocolate into long and small shards, leave in the freezer until needed. 

Toss the banana with the lemon juice then stir the sliced banana into the caramel mixture. Alternatively, hand blend the banana and lemon until smooth and fold into the caramel mixture, along with the half tin of dulce de lech (for an overlowing pie). Spread into the pastry case. Chill (freeze) until set. 

For the topping, whip the cream  with the icing sugar + vanilla (if using) until medium peaks form. Pile on top of the pie and decorate with chocolate curls/shards. 

So. Many. Pictures! 

Love Em xx

I am really sorry but all comments for this post have been lost in Blogger's system/archive/brain somewhere and I cant retrieve them! Please forgive me x

Wednesday, 17 July 2013

Brioche au Chocolat

I’m clueless and dead level confused when it comes to bread. Honestly now, why do people eat toast all the time? 

Sliced Hovis with a slither of butter, maybe some chopped mild cheddar tossed on top to make it dull as dishwater. Seriously, what’s the deal with the toasted fortified bread?!

Its my family’s morning fuel, but I usually settle for milk chocolate cooking chips. The weekly shop is few and far between at home , but the instant coffee, milk and sliced bread never runs low, can you relate? *

I wish the amenities had a bit more excitement injected into them. I wish my home was in Belgium and my made up brother would panic whenever we had a shortage of chocolate, resulting in him popping to the off license to pick up a slab for our brioche au chocolat in the morning. Obviously there would always be proofing brioche dough in the fridge without fail. 

Can you imagine? Chocolate custard savoury bread for breakfast. All-the-time. 

People wish for a lot of things, sometimes I wish I were an elf serving Santa all year round- this is probably more likely than brioche au chocolat becoming an amenity in suburban London.

To bide the time between now and my wish becoming reality, I have made this brioche as a one off. For one day (which went far too quickly) we had brioche au chocolat for lunch and dinner; the ‘pastries’ are the perfect balance of sweet and savoury. 

The brioche is rich and crumbly and far from cakey. The custard adds softness to the texture, but the sugar hit will mainly stem from the chocolate - which is dark - making this the ultimate ‘must eat’ (everyday). 

Lets all agree to make brioche the best thing since sliced bread.

* My sister walked through the kitchen after I wrote this post and said "Hmmm what should I have on my peasant toast?"  She admitted that she thought it sounded 'uppety'. As in: snobby. As in: who the hell eats brioche everyday? If I offended anyone in this post, sorry! I simply hate toast, I dont have anything against anyone who chows down on the stuff! 

The Recipe: Brioche Au Chocolate

Adapted from Joanne Chang's Spectacular Recipes from Boston's Flour Bakery

For the brioche:
315g plain flour
340g bread flour
28g active dried yeast
82g sugar (granulated or caster)
1 tbsp salt
120g cold water
310g unsalted butter, softened and cut into cubes
6 medium eggs

Note: This recipe will make 2 lots of dough, Chang strongly suggests not halving the recipe as you wont have enough in the mixer to get the appropriate incorporation when mixing. See the method notes for what to do with the 2nd half of brioche dough.

Note II : I dont think you can make successful brioche without a stand mixer, unless you fancy a dead arm. I think it could work in a bread maker by just setting the 'kneading' timings each time. 

For the pastry cream:
300g milk
100g sugar
10g plain flour
20g cornflour
4 egg yolks
1 tsp vanilla extract
1/2 tsp salt

150g dark chocolate, roughly chopped

The Method:

Note: Read this recipe through before diving in, just to get an idea of timings: I made the brioche and custard at night, then I let the brioche proof overnight and the custard set in the fridge. Then, in the morning I put together the prepared pastries then set them aside to proof again. I had fresh brioche at 5pm that day. 

The Brioche:
Weigh out all of the dry ingredients in a freestanding mixer with a dough hook attached. Mix the ingredients together until everything is combined. Add 5 of the eggs and beat on low speed for 4 minutes. Stop the mixer and scrape down the sides of the bowl. Continue mixing for 4 minutes. The dough will be stiff and dry but do not threat!

With the mixer on low, add a cube of butter at a time, mixing after each piece so that it combines with the dough. Continue to mix on low for 10 minutes, stopping the mixer occasionally to scrape down the bottom and sides of the bowl. If necessary, break the dough up with your hands to help incorporate the butter - there are some places the mixer can't reach!

Now that the butter is fully incorporated,  turn the mixer up to medium speed and beat for 15 minutes. The dough will become shiny and soft, but questionable at first. Then turn the mixer up to medium-high speed and beat for one minute. The dough should 'slap' the sides of the bowl at this point, and when you pull it, it will stretch. If not, add a couple tablespoons bread flour and continue to beat for a few minutes longer.

Place the dough in a bowl and cover the surface with clingfilm. Let the dough proof in the fridge for 6 hours/overnight.

The Pastry Cream:
In a medium saucepan, scald the milk (not so its boiling).

In a small bowl, stir together the salt, flour, cornflour and sugar.

In a medium bowl, whisk the egg yolks until well blended. Slowly whisk in the flour mixture until a thick paste forms.

Take the milk off the heat and slowly add it to the paste, adding a little bit at a time, making sure to mix after each addition.

Return the new mixture to the saucepan (on medium heat) and whisk with vigor for 3 minutes, or until the mixture thickens and starts to boil. As soon as it starts to boil, whisk for 10 seconds and immediately take off the heat.

Pass the custard through a fine sieve directly into a heatproof bowl. Fold in vanilla extract until dark streaks are no longer visible.

Cover the surface of the custard entirely with clingfilm and leave to set in the fridge.

Brioche au Chocolat: 

Line 2 baking trays with baking parchment.

Remove the dough from the fridge and divide in 2. Place the second half in the freezer - where it will keep for 1 week. *

On a floured surfaced, roll the dough out into a rectangle that is about 20 x 10 inches, with the long side facing you.

Spread the pastry cream over the entire surface of the dough. Sprinkle the chopped chocolate over the bottom half.

Carefully fold the top half of the dough over the bottom half and gently seal the edges together using your fingertips.

Using a sharp knife cut the dough into 2 x 10 inch rectangles. To do this, make a small incision at the top of the dough every 2 inches, so you know where to cut. You should end up with 10/12 pastries.

Using both hands, transfer each pastry to the baking trays, spacing them 4 cm apart. Lightly cover with clingfilm and leave to proof for 2 hours in a warm spot.

Preheat the oven to 176 degrees C.

In a small bowl whisk together 1 egg. Take a pastry brush and lightly coat each pastry with beaten egg.

Bake in the oven for 35/40 minutes. Let cool on the trays for 20 minutes. They are best served within 4 hours of baking and will keep for 1 day.

*For the unused half of dough, you can simply defrost, place in a loaf tin, let proof for 2 hours & bake for 35 minutes for a brioche loaf.
Delicious brioche aside, its damn hot in London at the moment. Me and my boyfriend took a last minute trip to Camber Sands to escape the stodgy city air. The beach was completely untouched, so natural that I had to share it with you. If you live in Greater London, how have you been coping with the heat? Here's a positive of my 'getaway' coping mechanism: Camber Sands is only 60 miles away!

Love Em xx

I am really sorry but all comments for this post have been lost in Blogger's system/archive/brain somewhere and I cant retrieve them! Please forgive me x

Wednesday, 10 July 2013

Peanut Butter Crack Brownies & Shortlisted for the Cosmopolitan Awards!

I was finishing up my last bits at work on Monday when it got to 6pm and I remembered something.

I opened a new window, tapped into Twitter and nervously scrolled through to find that tweet. The one with that link that would take me to the Cosmopolitan Blogger Awards 2013 Shortlist.

As I pressed the link, my stomach sank. It sank further when I saw a blank page. 

Oh god. Oh god.

 I made a quick scurry to the loo’s moments later to see if the link worked best near toilet facilities (obviously this had to be an option in my desperate state). 

A few taps later and I was prancing around the workshop, jeans at my thighs, jumping like a loon with Nat (she had no idea what was going on). I had been shortlisted again!!!! Er. Mah. GAAAAHD.


Who better to thank than the person reading this right now? Seriously, thank you so much!

If you would like to, you can vote for me here by heading to the 'Best Food Blogger' category, voting closes on 31st August so there is no rush, but I would be super grateful if you did! (Eventually....)


Orrrrrrrr you could just click on the picture on the right ;)

To celebrate I have made something close to crack. I couldn’t think of a better way to emanate my excitement and show thanks to you all. Really I couldn’t. Luckily this stuff wont kill if you get hooked, you might gain a few but hey - see them as happy pounds.

This brownie/rice crispie cake on steroids is jam-packed with every single confection known to man - it’s salty too so it's right on trend.

The recipe uses a brownie packet mix, but only because there is so much going on that I defy you to taste the difference.

Here’s why you can use packaged brownie mix without losing your credentials as a foodie; the crack brownie contains: 

smooth peanut butter
double stuffed Oreos
rice crispies
chocolate
peanut butter cups

And whatever the heck you put in the brownie itself. In my case:

marshmallows
white chocolate
crunchy biscuits.


To continue the celebrations (I don’t go out much), I will be hosting a special little giveaway next week! So keep posted, I reckon you’ll like this one :)


The Recipe:

Adapted from Cookies & Cups Peanut Butter Cup Crack Brownies 

1 brownie mix, boxed or homemade
230g bag mini peanut butter cups
1 packet 'Extra Stuff' Oreos
1 + 1/2 cup rice crispies
1 + 1/2 cup milk chocolate chips or bars
1 cup smooth peanut butter
1 tbsp / 15g butter, un/salted

Makes 20 bars 

Note: Grab the most indulgent looking Brownie mix i.e. the one that says ‘Indulgent Brownie Mix’ so people don’t think your skimping on quality even though it only cost you £1.78 - the price of a good chocolate bar. If you’re still not sold, have a look here and here for sole brownie gooooo-oooo-ooodness.  

The Method:

Start by making brownies in a lined rectangular pan according to directions and roughly chopping Oreos and peanut butter cups.

Take the brownies out of the oven 5 minutes before the required baking time and sprinkle chopped peanut butter cups & Oreos over the top. Return to the oven to complete baking.

Once brownies are baked, remove from oven and immediately spread the melted peanut butter cups & Oreos around the entire surface of the brownie using a spatula.

Evenly spread half a cup of peanut butter on top of the chocolate layer and set aside.

In a large microwaveable bowl add the remaining peanut butter, milk chocolate chips and butter and microwave in 30 second bursts until just melted, making sure to stir each time.

Pour in rice crispies and stir until combined. Evenly spread over the brownie. Cover and refrigerate for at least 2 hours to set. The brownies will last for up to 5 days.

We managed to raise £370 for Race For Life! And I crossed the finished line! Wooohooo. Thank you to all those who sponsored us, Blackheath, you nearly killed me but it was for the worthiest of causes so I'll let you off.

Love Em xx

I am really sorry but all comments for this post have been lost in Blogger's system/archive/brain somewhere and I cant retrieve them! Please forgive me x

Tuesday, 2 July 2013

Almond Chocolate Chip Sandies


Is it possible to live without an obsession with institutionalized American desserts? 

Think about it. What the hell was you craving before you first caught your tongue on that first bite of red velvet layer cake?  Don’t even get me started on pie. All pie. Pumpkin. Pecan. Apple. Bar pork, but that’s not even from the states and who likes jellied meat encased in hot water crust pastry anyway?

I’m not an American. But as I discover edible American staples, I wonder why I haven’t packed my bags and jetted off to Boston to formerly beg Joanne Chang for that job at Flour.

Pecan Sandies are an old American tradition that lives on to this day, piled high in most American supermarkets. They are shortbread-like biscuits with crunchy chopped pecans added to the mix, and then heavily dusted with sugar before and after baking.  You really can’t go wrong. 

I don’t know when sandies came about, or what maid accidently fell onto a cake pan and flattened it out to reveal a cookie pan and suddenly someone in the 1800’s invented the pecan sandie.


I wanted to take this oil-based biscuit and make a strictly ‘no pecan’ meal out of it (change is good), sooooo seeing as I (women) cant live without chocolate, I threw in an overflowing handful of it for good measure. 

Shortbread and chocolate have always worked well together and as my sandies are not bearing pecans, it goes without saying that the almond/chocolate/buttery biscuit combo is indescribable.


This is a little out of the blue but on Sunday I will Race For Life in Blackheath with my cousins! It is such a worthy cause, please take a look at our page to read why we’re doing it :) 

I will update in my next post as to whether my sugar addiction overcame my ability to cross the finish line....


On a slightly more boring slash kinda important note

Some of you might be aware of Google’s latest assassination. Google Reader has been shoved through the front, back and side door. I have been using Feedly and Bloglovin’ to stay up to date with the latest in the blogosphere. If you want to keep reading mbakes, you can easily subscribe via Email, Feedly (subscribe by clicking Add Content in top left hand corner) or Bloglovin’. 

I am also on Facebook, Twitter and Pintrest! So there really is no getting away from me.


Almond Chocolate Chip Sandies

Ingredients:
100g unsalted butter, softened
100g caster sugar + extra for sprinkling on top
125ml sunflower oil
340g sifted plain flour
1 egg, large
1/2 tsp vanilla extract
1/2 tsp cream of tartar
1/2 tsp baking soda
1/2 tsp sea salt 
100g sliced almonds + extra for topping
A handful of milk chocolate chips / 100g

Makes 20 large biscuits

The Method

In a mixer, beat together sugar and butter until light and fluffy. Add the sunflower oil and beat until foamy, about 4 minutes. Add the egg and vanilla until incorporated.

Sift in the flour, baking soda, salt and cream of tarter and beat on low until a dough forms. Add sliced almonds and chocolate and mix through with a spatula.

Wrap tightly in cling film and refrigerate for half an hour, or over night.

Preheat the oven to 170 C and line 2 baking trays with baking parchment.

Roll 20 walnut sized balls and place on baking trays, the cookies will not spread so do not worry about spacing them too far apart. Sprinkle a load of caster sugar over each ball.

Take 2 to 3 sliced almonds and press them into each ball to flatten the cookie slightly. Sprinkle with more sugar.

Bake for 12 minutes, until the cookies have only slightly browned and are still largely pale. Leave to cool completely on the baking trays to continue the baking process without browning the biscuits. Biscuits will keep for 3 days in an airtight container.


Love Em xx
Template by Pink + Lola