Monday, 27 May 2013

Easy Baked Ricotta Pears With Amaretti


The thought of biting into hot fruit kinda makes me squirm. Why would you want to replace a succulent and refreshing pear with a warm soggy one? 

Ever since my mum’s gallstones started causing grief, fatty desserts have been avoided like the plague, bar a couple of occasions…

But the idea of pairing soft cheese (see what I did there?) and cinnamon together as part of a fruity, marginally healthy after dinner treats sounds way less squirm inducing. 


If you’re still not sold consider this: the more cheese you add, the easier it becomes to eat a hot pear, seriously. The one I ate was practically a ricotta sandwich. 

There is something so seductive about sugary sweet cinnamon ricotta eaten entirely on its own, its a fave in the med. Find it wrapped in pastry parcels, fried, then tossed in more sugar & cinnamon in Northern Cyprus slash the confines of a terraced house in South East London and/or 1 in every 5 homes in North London. Again, not kidding. Turks eat this stuff all the time!

I knowww its nearly June and comfort food got left behind a good 4 months ago, but how can anyone pass up a cheesy pair!? 

Especially when you can rustle them up in 4 steps.


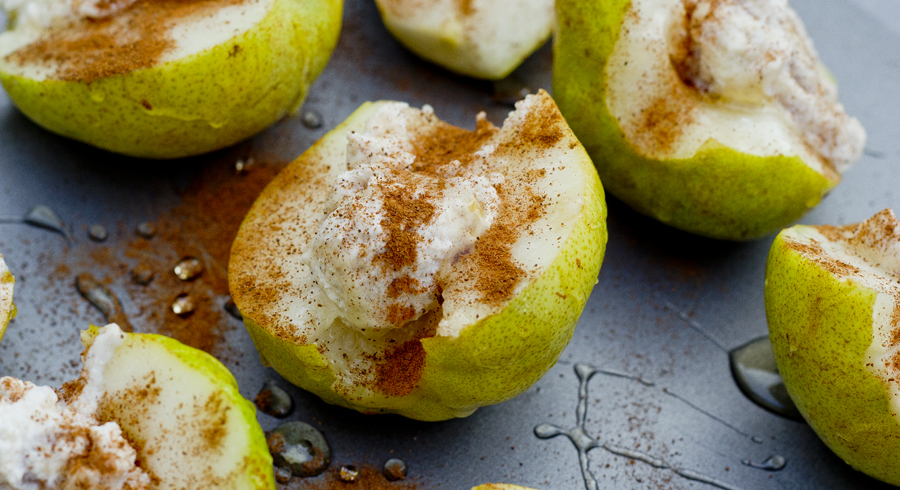
The Recipe:  Baked Ricotta Pears With Amaretti 

Adapted from BBC Good Food's Easy Baked Pears

5 ripe pears
150g ricotta
2 tbsp + 1 tsp ground cinnamon
4 tbsp clear honey
2 tbsp sugar
100g amaretti biscuits

The Method:

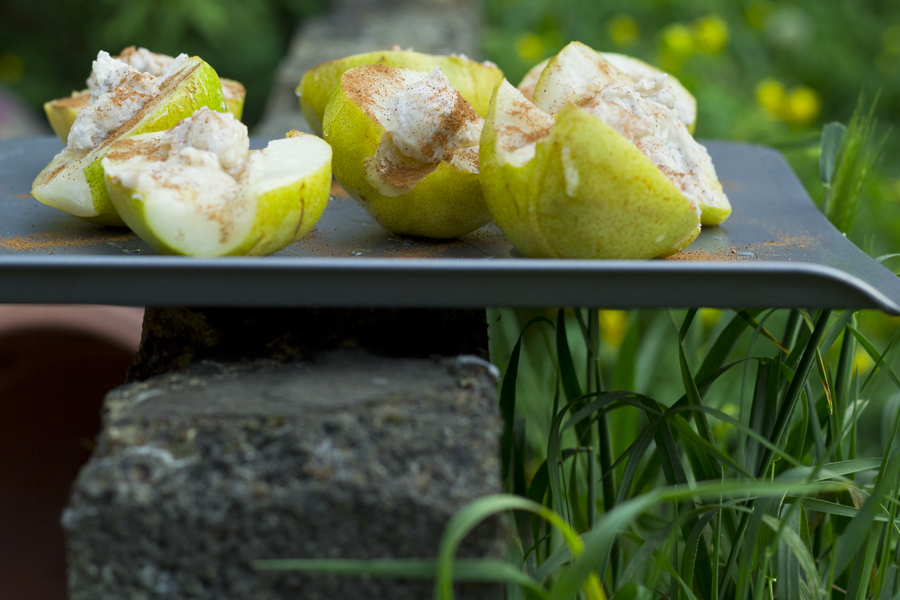
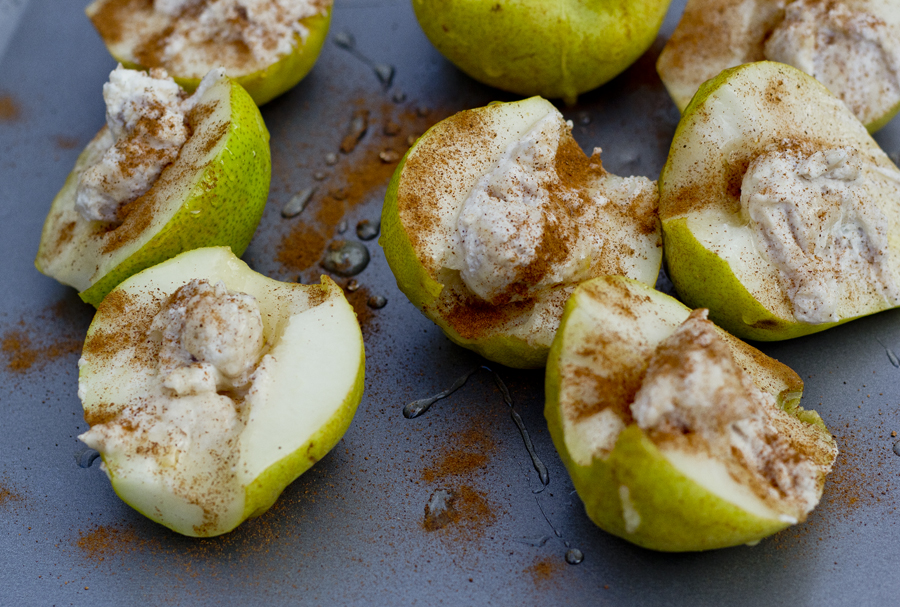
Heat the oven to 170C. Cut the pears in half and take out the core with a teaspoon.

Place the pears on a baking tray and bake for 10 minutes.

In the tub of ricotta, add sugar and 1 tsp cinnamon and mix together.

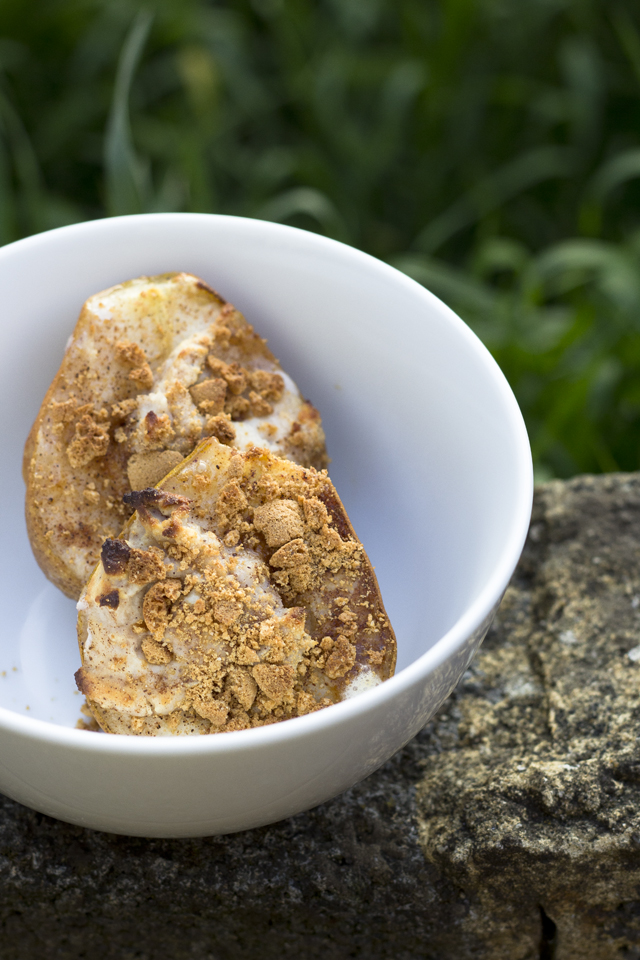
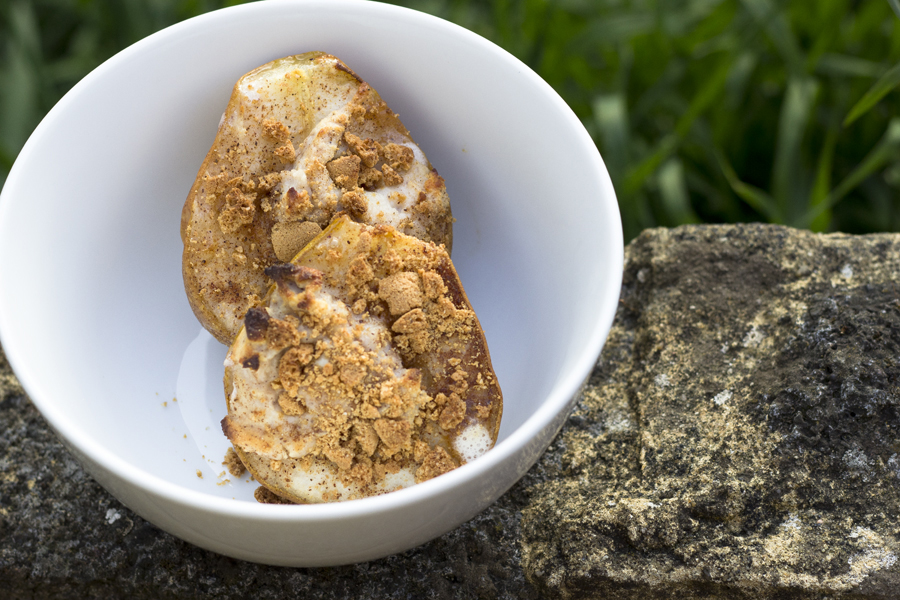
Put the biscuits in a sandwich bag and bash the life out of them, you want crumbs and rocks.

Take pears out of oven. Drizzle with 1 tbsp honey. Spoon a tsp of the ricotta mixture into the cores of each pear. Sprinkle a generous amount of amaretti over each pear.

Place back in oven and bake for 10 minutes. Drizzle with the rest of the honey. Serve warm.
Easy Baked Pears
Hope everyone had (in the words of old Oliver) a right cracking, pukka Bank Holiday weekend. My fave new Bank hols past time? Getting a £65 parking fine. Peak times.

Love Em xx

Friday, 24 May 2013

Salted Caramel Chocolate Doughnut Cake


It was mum’s birthday this month.

Obviously, mums deserve ‘showstopping’ cakes; do you think this covers it? I pretty much copied the style of this cake from Blue Bird Kisses, as you can see, hers looks like it was sent from heaven

Mine? It's pushing purgatory. 

I needed the cake to be nothing short of extravagant and mouthwatering down to the last crumb - so it had to be a tried and tested recipe. Something no fail and one I’d used before to ensure an all round success. 

The Sweet ‘n’ Salty Chocolate Cake from Hummingbird Bakery was my first, last and only option. It ticks all the boxes and has about 500 different steps to it so be prepared to spend your evening by the stove. 

To go the extra mile, I soaked the cakes in the homemade salted caramel as soon as they came out of the oven, knowing full well that it would cause me a cake covering disaster. That’s love, eh?


The Recipe

Adapted from Hummingbird Bakery's Sweet n Salty Chocolate Cake

For the chocolate cakes
300g unsalted butter 
300 caster sugar
140g light soft brown sugar
100g cocoa powder
160ml buttermilk
60ml water
330g plain white flour
3 large eggs 
2 tsp baking powder
1 tsp baking soda
1 tsp sea salt
For the salted caramel 
200g caster sugar 
2 tbsp + 1 tsp golden syrup (or corn syrup)
120ml double cream
60ml soured cream
60ml water
1 1/2 tsp sea salt 
For the chocolate icing
450g dark chocolate (55%)
360ml double cream
450g unsalted butter, cubed
2 tbsp golden syrup (or corn syrup)
1 tsp sea salt 
Note: Half the recipe for a small 6 inch cake if you dont have many mouthes to feed. 

The Method

Start with the salted caramel. In a medium sized pan add the sugar, water and golden syrup. Heat gently for 10 minutes until it changes colour and turns slightly syrupy. 

In a smaller pan, bring the double cream, salt and sour cream to the boil and then immediately remove from the heat and carefully pour into the caramel. Stir until silky smooth, pour into a jug, cover with cling film and set aside.

Make the chocolate icing. In a medium sized pan add the sugar, water and golden syrup. Heat gently for 10 minutes until it changes in colour and turns slightly syrupy.

In a smaller pan, bring the double cream to the boil and then immediately remove from the heat and carefully pour into the caramel. Stir until silky smooth and set aside to cool slightly.

Roughly chop the chocolate and add it to the slightly cooled caramel, stirring constantly until the chocolate has fully melted. Whisk the mixture with an electric whisk for 5 minutes until the chocolate feels cooler.

Whilst whisking, add the butter to the chocolate mixture until the icing appears whipped. Transfer the mixture into a bowl, cover with cling film and refrigerate for 45 minutes whilst you makes the cakes.

Preheat the oven to 170 C.

In a freestanding mixer or with an electric whisk, cream the butter and sugar until light and fluffy, about 4 minutes. Add the eggs one by one, until well incorporated making sure to scrape the sides of the bowl after each addition.

In a measuring jug add the cocoa powder, buttermilk,vanilla extract and water. Stir to form a thick and smooth paste.

In another bowl add the flour, baking powder, baking soda, salt and stir with a spoon.

Alternatively add the cocoa paste and flour mixture to the creamed butter whilst mixing everything continuously.

Once the batter appears creamy and consistent in colour, stop mixing.

Divide the batter into two or three tins and bake for 25 minutes if using three tins, and 40 minutes if using two tins. Make sure a toothpick comes out clean before takings the sponges out of the oven.

As soon as the cakes are out of the oven, pierce the cakes several times with a sharp knife and pour a thin layer of salted caramel over the tops of the cakes.

Transfer the cakes onto a wire rack and leave to cool completely.

If the icing is stiff by this point, zap it in the microwave for 20 seconds and give it a stir.

To assemble the cake, add 2 tablespoons of icing to sandwich each layer and cover the sides with icing.

Stack with little donuts for the finishing touch.

The cake will keep for 3 days.
 Sweet 'n' Salty Chocolate Doughnut Cake 

Love Em xx

Thursday, 16 May 2013

Kitchen Sink Cookie Dough


Add caption
Whose noticed raw cookie dough popping back up in supermarkets? They taste AMAZING. 

Asda were the first to make the move way-back-when, me and a friend used to buy a packet each (250g I believe, fat as anything!), hide it in our cool grunger handbags and have a right old fiest in the cinema not caring about all the pasteurized egg going in our tums.  

So its 2013 now and Tescos stock it too, I reckon that prompted ol' Asda to jump back on the wagon. 

You’d think they were sponsoring this post. They’re not by the way, I’m just not that into milling my own flour and churning butter.

Who aint got a craving for cookie dough 24/7? Seriously. Take the egg out of any recipe, and voila. Delicy-mo! (Is that a word?)


Add just about anything you like:

Pretzels, wine gums, a little bit of pepper? 

Its kitchen sink cookie dough people! But there is one rule, seeing as its ‘kitchen sink’ you kinda absolutely 100% CANNOT skimp on the cornflakes. They are a must. Yumyum AND Crunchcrunch all at once. 

But you don’t have to use M&M’s. Or chocolate chips, although I did…but come on, its cookie dough!


The Recipe:
228g unsalted butter, softened 
150g white granulated sugar
165g soft light brown sugar 
290g white plain flour 
3 tbsp full fat milk
1/2 tsp vanilla extract 
1/2 tsp sea salt 
2 packets chocolate chips
40g cornflakes
1 packet of any sweet you can think of!

The Method:

Cream the butter and sugars together until soft and light in colour. 

Add the flour, vanilla and salt and mix on low speed until combined. 

Pour in the milk, add more if the dough still appears too thick and sticky and if you want a 'dipping' consistency. 

Put in the chocolate, cornflakes and *sweets* and mix on low for 10 seconds until just combined. 

Using a spatula, combine the chocolate and cornflakes together until everything is even. 

Place in a bowl and enjoy for up to 3 days.

Alsooo, I have a birthday cake post coming up ! I will say no more, you will just have to come back and have a look at it. Just as soooon as I meet all my deadlines... Not long at all, then! 

Love Em xx

Friday, 3 May 2013

5 Ingredient Killer Key Lime Pie


With summer on our footstep all I wanna do is shove fruit in my gob and eat stuff with piles of cold, whipped cream thrown on top of it. 

It is really difficult though, to leave wintry desserts behind - I don’t know about you but I wont say no to a treacle pud whatever the weather. 

Here’s a little warning if you’re feeling in the mood for this pie - its expensive to make. But take a deep breath. Its worth the extra dough. 

Why? 

Well, quite frankly, why not? 

But also because it tastes so darn fresh and the textures mingle so darn well together that it almost tastes like a really expensive, professional pie prepared in a swanky restaurant in the likes of up-town Manhatten. That’s exactly why its worth the 15 pounds well spent on ingredients, its such an effortless pie as well - you can hardly taste the supposed richness from the 8 egg yolks too! 

So easy. SO worth it. 
Key Lime Pie

The Recipe:

Adapted from Hummingbird Bakery Book 1 Key Lime Pie 

For the pie crust
500g digestive biscuits or graham crackers
200g unsalted butter, melted
For the filling
800g condensed milk (2 tins)
8 egg yolks
Zest of 5 limes
Juice of 5 limes
For the topping
300ml double cream, whipped

Equipment
23cm deep pie dish

The Method:

Preheat the oven to 170C. Put all of the biscuits into a food processor and pulse with the blade setting until fine crumbs form. Whilst the processor is still running, pour in the melted butter until crumbs appear sticky.

Pour the crumbs into a pie dish, with a tablespoon and your fingers press the crumbs into the sides and bottom of the dish. Bake for 10 minutes until darker in colour then leave to cool until warm.

Preheat the oven to 150 C. Zest and juice all of the limes and set aside.

In a large bowl or freestanding mixer with the whisk attachment, add the condensed milk, egg yolks and lime juice and whisk until thickened - 1 minute.

Set aside a small amount of lime zest for sprinkling on top of the pie and add the rest into the condensed milk filling.

Pour the filling into the prepared pie crust and bake for 20 minutes.

Leave to cool completely and in the mean time, whip the cream using a whisk until stiff (but soft) peaks form. Layer the cream on top of the cooled pie and garnish with the reserved zest.

Pie is best served after 2 to 24 hours of 'settling/flavour mingling' time in the fridge.

Have you ever made Key Lime Pie, was it as darn simple as this beaut?!


Can I hold your attention for a little longer??

I have gone and nominated myself for this years Cosmopolitan Best Food Blog Award! After some crazy miracle (thank you readers!!) I managed to get shortlisted last year (wdf?), I would be aaaaaaabsolutely thrilled if you could nominate me again! Please click here if you fancy it.

Or here.

Orrrrr here?

Perhaps here?

Am I sounding desperate yet? Tehehehe.

THANK YOU!!

Love Em xx
Template by Pink + Lola